 |
Those of you with long memories may remember our story Bringing Baby Home from, oh, many issues ago. In that story, we related how we found a long-sought-after 1800S project car, not running but complete, and how we trailered it home. That story was not of lasting interest, so it's not archived -- sorry. If anyone really must know, we can dig it up for you. Anyway, our '67 1800S (no, we don't really call it "Baby") spent somewhat over a year sitting under cover in our driveway and being, for the most part, ignored. Look, if you had a limited amount of time and energy to work on your Volvos, would you spend it on the daily driver or on the non-running project? Right. The car had previously sat for some three years in Neil's -- the original owner's -- carport for much the same reason.
The best answer that came was "in the trunk of the 1800S." Some urgency attached itself to that idea -- after all the effort and money we'd put into handling mods on the 122S, arthritis of the front end was not to be tolerated. Well, a few weekends of work should get the coupe on the road; then, I could take my time and fix the 122S properly. Before his project got sidelined, Neil had taken the entire interior of the coupe apart for a complete reworking. It had nice new leather on the dash and seats, but it was still apart. Neil had meticulously made drawings of how the gauges wired up and had sorted hardware into little bags and jars (and even provided a nice foam mat to lie on), but I didn't relish spending long hours under the dash -- which is, largely, why the car sat so long. I knew I'd develop more enthusiasm if I could only get started, -- so I did.
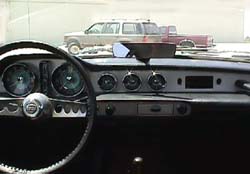
The dash was tacked on with two fasteners, neither of them correct. I combed through bags and jars of unfamiliar stuff, and finally found a bag with what looked like the right nuts and bolts -- and a lot of other hardware as well. After an hour of trial and error, the dash, wiper mechanism and steering column were firmly attached. Good, that was easy. Now, about all these wires... Neil had made his drawings to suit himself; I found them cryptic. Most of the gauges were self-explanatory, but the switches were not. To me, the drawings were backwards, but I found I couldn't count on that. I had a wiring diagram in the owner's manual, but no color codes. My head soon started to hurt as much as my neck. Eventually, I disconnected anything I wasn't 100% sure about, yanked all the wires off the fuse blocks under the hood, and spent a full afternoon with the wiring diagram and an ohmmeter. I got hung up for a while by getting false readings through the interior and under-dash lights until I figured out which switch positions turned them off. Wires gradually found their places. Fortunately, this is a very simple car and the wiring harness is in remarkably good shape; otherwise, I'd be under there yet. Next came the capillary tubes for the oil pressure, oil temp and water temp gauges. Where the heck does the oil temp go? Out came Bill Webb's Swedish Iron book -- oh, that's where. Must go through this hole here... The end of the speedometer cable was twisted off -- I'd get that on order right away. I wriggled out of the car for the umpteenth time (Neil, I can't thank you enough for the foam mat!) and looked back admiringly at my handiwork -- except that nothing looked any different. Well, I could put in the passenger's seat; nothing much would need further work under that side of the dash. There was a jar labeled "R seat" (the only one that was labeled at all -- in all fairness, Neil never planned for someone else to have to decipher all this) and four rails among a lot of yet-to-be-identified parts on the shelf under the rear window. One of the bags had some big springs in it that looked like they'd go between one of the rails and the thingy bolted on the floor. Simple. I only put it together wrong about four times before I figured it out. At that point, I came upon a lovely, unambiguous drawing of the seat rail assembly in Neil's notebook. It was nice to have confirmation that I'd gotten it right at last.
Hunger, darkness and Monday loomed up all together -- time to quit. I sat in the passenger's seat -- ah, very comfortable! If it had been on the driver's side, I'd have made motor noises and taken a quick row through the gears; as it was, all I could do was squeeze the grab bar on the dash and yell "Criminy! Slow down!" a few times. I put the car cover back on reluctantly. Not a bad weekend's work.
Most things being wired up with some level of confidence, it was time to apply electricity. It had been four years since the battery last had a charge, so I traded it in for a big new one. Just as a final check for shorts, I hooked up the positive terminal and completed the circuit between the negative terminal and the ground strap with my meter set on the 10 amp scale. If there were no shorts, there would be no current indicated. The needle gave one brief swing and the meter quit working. One cup of coffee and many head-scratchings later, my eyes fell upon the small print on the meter's face: "Maximum current 750 mA." Okay, let's pull the back off this thing -- sure enough, there's a blown ¾ amp fuse inside. Also, there's a nice spare fuse in there. Ah, back in business. So why the heck is there a 10 amp setting on the scale selector knob? "Our amps go up to eleven..." Never mind. I'm an electronics tech, and I know fully well that you can't put ten amps through these skinny meter leads -- anyway, something was drawing more than ¾ amp -- why? Once again, I was the victim of the interior lights. The switch was set for them to come on with the doors open. Click! No current draw at all. I hooked up the other side of the battery. 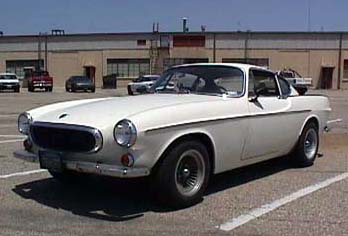 All I knew about the gas was that, however much (or little) was in the tank, it was four years old. I had gone on a campaign at work to give away "free lawnmower gas -- just bring your can to the house" without success. Calls to the county and several recycling outfits had produced no takers for old gas. We don't have a lawn. Looked like I was stuck with whatever was in there. Covered or not, the car had sat outside through a record-rainfall winter. I knew the drain by the gas filler was clear (if this plugs up, there will be water in the tank), but four-year-old gas can't be too great even if water stays out. There was no help for it. I took the floats out of the carbs and gave them and the float bowls a bath with carb cleaner. I pulled the distributor cap off and cleaned up in there, too. Points, cap and rotor looked good, so I gave the distributor cam a dab of lube and oiled the felt. Twisting the rotor produced advance, and it sprang back nicely on its own. I filled the radiator expansion bottle with distilled water. The oil looked like oil. Time to crank this thing over. "Oh, Marsha, can you come out here for a minute?" Marsha worked the ignition key while I held a clean glass jar under the disconnected end of the fuel line. In seconds, there was a few inches of yellow liquid in the jar. It looked and smelled more like gas than either varnish or water, so I poured it into the float bowls and put everything back together. Now, it was my turn. Sitting on Neil's foam mat (still more work to do on that side of the dash), I pulled the choke out and cranked the motor. Vrooom! It fired right up like it last ran yesterday -- very gratifying. The oil pressure came up immediately, the generator light went out and there were no scary noises. The tach did nothing, and the gas gauge stayed stubbornly on its peg. Well, maybe it was running on the last cup of gas in the tank; no telling yet. As the yellow stripe obediently climbed up the water temp gauge, I fed in the choke. It wanted lots of choke to keep running, so I diddled with the carbs for a few minutes. By the time the temp gauge stabilized, the motor idled smoothly with no choke and showed some willingness to rev. Time to shut it down. A careful check showed no oil or water leaks. I changed the oil and filter and swapped the old, cracking gas line for some fresh tubing and a new paper filter. The radiator had sucked up the contents of the expansion bottle, so I gave it another drink -- I hadn't figured out yet that you can hold the thing up high enough to fill the cooling system at one go; it took a few more fillings on subsequent days, which gave me visions of having to take the heater core out, but it turned out to be a false alarm. Marsha pumped a bunch of Castrol LMA through the brake system (while I manned the catch bottle and bleeder valves) to get out the ossified old fluid. Soon, we had nothing but clean liquid coming through. The pedal seemed a little soggy compared to our 122S's, but that might be normal with a brake booster in the system (a modern unit Neil had mounted in place of the defunct original) and the motor not running. The coupe went up on stands while I installed the new speedo cable and replaced the clutch cylinders and flexible connecting hose. Four years of inactivity had turned them into a science project -- not worth trying to rebuild. The coupe came back down off the stands and I hooked up the defroster hoses, only crumpling one of them in the process. In went the driver's seat -- twice. The passenger's seat was then also repositioned to "inboard" in the interests of symmetry. The steering wheel was still not mounted -- one less thing to bump into while working under the dash -- and I had been completely baffled by the horn mechanism, which was neatly bagged by itself. Other old Volvo horns operate by squeezing two metal plates, separated by an evil foamy substance, together (see the horn repair article in the Archive). Search as I might through all the bags, boxes and paraphenalia that came with the car, I could find no such beastie. E-mail to other 1800 owners provided no answer; all either had the newer three-spoke wheels (which do use the foam/wafer sandwich system) or had no idea what went on in there. I prevailed upon the parts guys at our Volvo dealership to let me go through their microfiche, which showed nothing about the innards of the steering wheel. Finally, a post to the BrickBoard produced results within minutes -- Glenn Goodspeed explained the horn's arcane workings to me. The mechanism was too simple for me to understand. Steering wheel on the car (horns working, even), it was finally time for a test drive. Everything seemed in order -- we'd already gotten new tags and insurance -- so I thought I'd give it a little test run up and down our beach road (25 MPH speed limit and little traffic) and then head down to the nearest gas station, two miles away. The motor fired readily. As it warmed up a bit, Marsha gave a final walkaround to double-check the lights. Brake lights? Check! Turn signals? Check! No, wait. Why is Marsha looking right when I'm signalling left, and vice versa? Uncheck. Well, good enough to get to the gas station -- I can remember to signal backwards that long, anyway. I proudly backed out into our tiny side street, found first gear (is that a narrow gate on these things, or what?), eased out the clutch (boy, those carbs sure aren't tweaked in yet, but we're rolling), signalled backwards approaching the corner, stepped on the brake to stop before turning, rolled right through the intersection and just kept going. I pushed on the brake really hard. "Uuueeengggghhh" said the brakes (really!) and reluctantly dragged the car down from its 10 MPH speed. Oops. Not quite ready for that trip to the gas station yet, it would seem. We survived the two hundred foot trip back to our driveway safely and called it a day.
This was Saturday of the Independence Day weekend, and Marsha and I simultaneously voiced the same thought about the car: "Born on the Fourth of July!" As darkness descended on our beach, we set our director's chairs out in the driveway next to the car and had a great view of the best fireworks show we've had around here in years.
|
 Ultimately, it was the driver that provided motivation. Our 122S developed an annoying creaking noise in the front suspension -- gee, it just had new bushings 100,000 miles ago, too -- and so we rapidly became the proud owners of a bushing kit and new ball joints, which proceeded to sit on the workbench. Lower bushings need to be pressed in, and, while I have access to a nice hydraulic press at work, that's fifteen miles from the house. Marsha needs the "other" car to go in the opposite direction every day. I work uncarpoolable (if that's not a word, it should be) hours, and there's no public transit here. You see the dilemma -- how to get the control arms to the press?
 I now discovered that the seat could bolt onto the rails in two positions -- "inboard" or "outboard." That was an easy choice; I could see the marks on the seat frame left by the old locknuts, so I mounted the seat "outboard." Little did I know that, when rebuilding the seats and covering them with that nice leather, Neil had switched the bottom frames from one seat to the other. This came to light some time later when I discovered that mounting the driver's seat "outboard" eliminates any possibility of pulling the hand brake up.
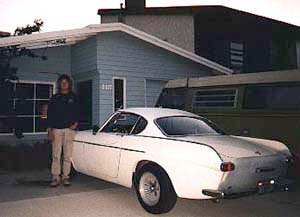 We counted this as a success -- a very qualified success, but a success nonetheless. After four years of immobility (one trailer trip and a few pushes here and there notwithstanding), the coupe was assembled and self-propelled. Just a little bit more work, and we'd be cruising down the road in fine style.