 |
| Calculate Your Speedometer Error | April / May 1998 | |
| Stupid Heater Tricks | February / March 1998 | |
| Cooling System Service | October / November 1997 | |
| Pilot Bearing | August / September 1997 | |
| Wheels for older Volvos | June / July 1997 | |
| Brake Fluid | April / May 1997 |
Calculate Your Speedometer ErrorRight from the factory, speedometers in most classic Volvos usually read a bit on the "optimistic" side -- the speedometer might read 60 MPH when the car is really only moving at 56 or so. Now, when many of us drive cars with transplanted transmissions, rear ends and different tires, speedometer readings can be wildly off.You can easily calculate your real speed by knowing a few numbers about your particular car and by having an accurate tachometer, even if you just rig one up temporarily. Electronic tachs may be presumed to be accurate. P1800 and 1800S owners, please see the footnote. You will need to know the rolling radius of your tires. Check them for proper inflation, then use a tape to measure perpendicularly from the middle of a rear wheel to the ground (front wheel for the 850 - V/S/C70). Record this measurement in inches. You need to know the rear-end ratio of your car. Stock ratios were usually as follows:
This is enough information to check your speedometer error in 4th gear without overdrive. Apply the following formula:
Let's try this out for a 120 4-door with no OD. The rolling radius of the tire was measured to be 12.5 inches (yours will vary -- this is just an example). We want to know how many RPM equate to 65 MPH.
Obviously, you don't want to be driving down the road punching a calculator or trying to work this out in your head, so there are two things you can do. The first is not elegant, but it is completely effective: work out the formula for four or five different speeds (that can be driven in 4th gear) and write down the results. Take an assistant for a ride and drive at the resulting RPM. For each speed, have your assistant write down what your speedometer actually reads. When you get back home, mark those speeds on paper tape and stick them at the appropriate places on the speedometer's face. Speedometer error is usually linear, so you can extrapolate for lower speeds as well. The second solution only works if the error is slight and you have time to tinker. The speedometer cable is driven by a gear at the rear of the transmission or OD unit, and this gear is available with varying numbers of teeth. A gear with more teeth will slow the speedometer down; one with fewer teeth will make it read higher. You can access this by removing the cable and undoing a nut (holding a clamp on the OD units). The drive assembly will then pull out (oil will run out; have a pan handy and more oil available). The gear is then easily replaced. The transmission does not have to come out of the car to do this. Frankly, the less elegant method works well enough for us -- we've won a number of TSD rallies with a strip of tape under the face of the speedometer in our 122S. After a few weeks of driving with it, you'll know where the indicator points at "real" speeds, and you can do away with it and impress your passengers: "Wow! We're going 100 MPH!" (but you'll know it's only 70).
Footnote: Back to the TopStupid Heater TricksA winter or two back, our 122S developed a bad leak in the rain. The carpet would get completely soaked, and the source of the water was a complete mystery. All seals seemed to be in good shape, and nothing above the floor would get wet.As we rely on this car for our transportation, there was not much we could do about it except mop up the water as much as possible (an old chamois does a pretty good job) and hope for an early spring. Unfortunately, that particular winter seemed determined to make up for the previous six years of southern California drought all by itself, so a certain amount of urgency attached itself to finding a solution. With all that humidity in the car, the windows would fog up almost immediately. Oddly, the defroster had little or no effect in clearing up the mist -- there were times when it actually seemed to make matters worse. The only way to drive the car was to arm the passenger with towels with which to continually wipe the inside of the windshield, and never mind about seeing out the back window. This was more than inconvenient -- it was positively hazardous, and completely unacceptable. Eventually, the answer came to us. There's a drain pipe in the air vent in front of the windshield. Over the course of the previous several years, this pipe had become pretty well plugged with old leaves and pine needles. This had allowed what little water we'd had fall during the drought to seep out with no problems (and I had learned not to spray water directly into the vent when washing the car). However, dirt and sand blown into the vent could not pass, and had finally calcified and plugged the top of the drain hole completely water-tight -- we couldn't even tell where the hole was just be looking at it. Rain water now had nowhere else to go but directly into the heater box, eventually running out the bottom onto our carpet. No wonder the defroster was just making the steambath worse! Of course, the fix is easy: clean out the drain. The easiest access is by removing the blower motor from the front of the box (you might be surprised by how much stuff you'll find lying around on top of the heater core, while you're in there). Remove the rubber drain tube and blow it out. Poke any crust out of the drain hole. Reassemble. This operates very similarly in the 544, 122 and 1800 cars. Back to the TopCooling System ServiceWith cool weather approaching, fall is the traditional season in which to service your Volvo's cooling system. Most people give the system a good flush with a cleaner and renew the antifreeze at this time.Here's a very simple tip that can greatly extend the life of your radiator, water pump and soft plugs: use distilled water in your cooling system. Buy a gallon or two at the supermarket -- it's one of the cheapest nice things you can do for your Volvo (actually, the tap water where we live is undrinkable -- we refill our water jugs for 25 cents a gallon at the vending machine outside the store). Even soft tap water contains ions which make the water a good electrolyte, and this makes corrosion possible. Antifreeze should be mixed according to the manufacturer's directions, usually in a 50/50 proportion with water. Antifreeze has three benefits: it freezes at a much lower temperature than water (that's the obvious one), it vaporizes at a somewhat higher temperature than water, so your engine can get hotter without "boiling over," and it contains corrosion-fighting compounds to offset the fact that ethylene glycol, the main component in antifreeze, is corrosive in its own right. Antifreeze also has two negative qualities. First, it is extremely toxic if ingested -- always capture coolant containing antifreeze when draining and recycle it! Many states have laws requiring stores that sell antifreeze to accept old coolant in return. The second negative (we've had some argument about this, but we'll stick with it): antifreeze transfers heat less effectively than pure water and reduces the overall efficiency of the cooling system. If you live (as we do) where it never freezes outside, and you have an older Volvo designed to run at relatively low temperatures, you might consider not using antifreeze at all. In this case, fill your Volvo with the distilled water and throw in a can of corrosion inhibitor / water pump lubricant instead of antifreeze. A final tip: when you service your cooling system, spend a few dollars more and an extra five minutes and install a new thermostat. The thermostat is very important in maintaining your engine's optimum operating temperature. This is important in any car, and is a critical factor in the proper operation of fuel injection. Back to the TopPilot BearingThe pilot bearing is an inexpensive but vital part of your Volvo's drivetrain. It is also easily overlooked, and it's failure can masquerade as a variety of expensive transmission or clutch problems. The pilot bearing is located in the rear of the engine's crankshaft, and supports the forward end of the transmission's input shaft. Wear in the pilot bearing places undue loads on the input shaft bearing, the junction of the input and output shafts, and, ultimately, the output shaft bearing.The pilot bearing is also exposed to any dirt and moisture present inside the bellhousing. I would strongly recommend that you inspect it and consider replacing it any time you have the transmission out of the car -- certainly whenever you replace a clutch. It costs only a few dollars and is readily available from most Volvo parts suppliers. There are a number of tools and techniques used in extracting an old pilot bearing -- I use a slide hammer, which is primarily a body working tool. Check your shop manual for suggestions on how to replace this important part on your particular Volvo. Back to the TopWheels for older VolvosTired of those skinny tires on your 1800S, Amazon or PV? You will need new wheels -- putting wider tires on the stock wheels is neither safe nor effective. There are several good answers to the problem. If you want to stick close to the stock look, you should be able to find a wheel shop that can weld wider rims onto your stock centers. The difference in appearence will not be striking, and you can use the original hubcaps or wheel covers.
Of course, there are a number of alloy wheels available on the market (if they don't list wheels for Volvo, tell them you need them for a '70s full-size Ford!) Whatever wheels you decide to use, try to stick with the stock rearset: the inboard edge of the rim should extend 3-1/2" from the mounting surface of the wheel (in other terminology, a 6"-wide wheel should protrude 3-1/2" inboard and 2-1/2" outboard, which is a positive offset of 1"). The idea is not to widen the track of the car by much -- it will hurt the handling, wear components faster and wreak havoc with the alignment settings. Wider is not better, unless it was originally designed into the car. If you want to maintain the stock ride height and speedometer readings, your tire dealer can match the diameter of the original tires with wider, lower-profile ones. This will affect your selection of rims: a 185mm tire fits happily on a 6" rim, a 195mm on a 6-1/2" and a 205mm on a 7". I much prefer having a moderate tire on a wide rim than the other way around. Consider also that the more rubber you have on the ground, the lower your optimum tire pressures will be and the heavier the steering will become. Happy rolling! Back to the TopBrake fluidProblem: Regular DOT type 3 or 4 brake fluid attracts moisture from the atmosphere, degrading the fluid and causing corrosion in brake and clutch cylinders. Girling clutch cylinders are aluminum and are especially prone to this problem. Silicon fluid does not attract moisture and holds up to the high brake temperatures involved in racing, but it has three drawbacks: it is expensive, requires a complete drainage and cleaning of your hydraulic system before installation, and it rapidly rots out the brake light switch on those cars equipped with the fluid-activated model. I can personally attest to this (at great length). Solution: Castrol LMA (stands for "Low Moisture Activity") fluid does not corrode cylinders or brake light switches, requires only a flushing of the type 3 or 4 fluid from your system, and is inexpensive. I don't know how suitable it is in a racing application, but I recommend it highly for street use. Back to the Top |
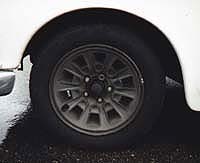 You may have heard that Ford or Chrysler wheels will fit a Volvo. This is true for the older cars -- the 1800E, 140 and newer cars use a bolt pattern unique to Volvo. Most 5-bolt Ford wheels that you'll find in salvage yards are 14" wheels, and you'll probably want 15", so be prepared to search a bit. Wheels from 1970's full-size Fords and Mercuries will most likely be what you'll find. They can look good with a little cleaning and paint, but are quite heavy.