 |
Cameron Lovre cameron@vclassics.com |
As you will recall from our last issue, Bob at The Works has been working on a full restoration of Carolyn's Amazon. When we left off previously, the body had returned from the sandblaster and Bob had sprayed it with a coat 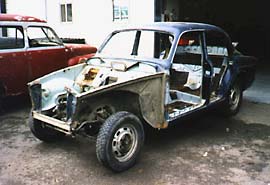 of primer and begun to correct dents, rust and prior repairs that weren't up to the standard required for this project. of primer and begun to correct dents, rust and prior repairs that weren't up to the standard required for this project.
Some of our readers have asked why anyone would go to this much trouble when a simple repaint can make a significant improvement for a cosmetically challenged car. This is true, but what Carolyn wants is not simply a pretty car, but a new Volvo 122. Her interest is not limited to having it look new, but to having every component replaced with a new part, every assembly disassembled and then reassembled, every piece of metal cleaned, stripped, plated or painted and reinstalled. |
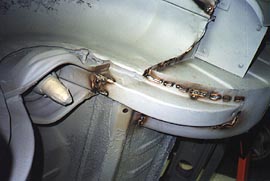 |
This shot shows the upper left spring seat and spare tire well. The well, left rear fender and rear valance had all been replaced at some point in the Amazon's past. Whoever it was that executed this repair initially didn't fully weld up the new seams, and Bob found that there were several gaps in what should be structural joints. |
| Unglamourous as the middle stage of restoration may be, this is a critical time to pay attention to the process on the body shell. One coat of primer won't do; instead, the shell has received several coats and has been block sanded between each coat with progressively finer sandpaper. This is to ensure that there are no high or low spots that would result in waves or flat spots anywhere on the car. Most of the primer that goes on the car ends up getting sanded back off again. | 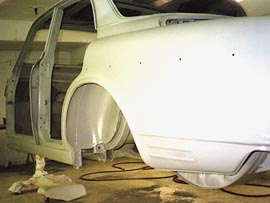 |
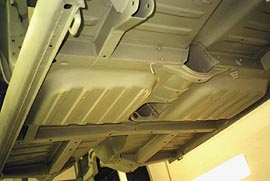 |
You'll remember the replacement box section from the floor from Part 1 (the repaired section is in the lower left of this photo). As it turned out, the same piece on the passenger side was also rusted to the point that it was replaced too, as well as two or three other sections that had rusted through in other areas of the floor. This photo shows the underside of the car after those repairs and before seam sealing. |
| The most visually impressive change to take place since our last visit is that the front suspension has been assembled and attached to the cross member. This assembly has now been set aside and will wait until final assembly. | 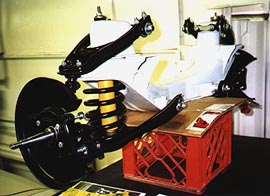 |
| As this goes to press, Bob is methodically sanding, correcting, priming, sanding and correcting again. This will continue until he believes that the shape and structure are as they should be and then comes paint. During all of this, back-ordered parts continue to roll into the shop and are separated out into different areas for reassembly later; the most recent arrival was large box full of new rubber pieces for the old Swedish Car that included body gaskets, new calipers, rotors and other odds and ends. We're looking forward to our next visit and to seeing what will have taken place during the next several weeks and of course, we'll keep you posted. |
| Photos by Bob Moreno
Contact info: 4065 W. 11th #12 Eugene, OR (541) 341-1316 |